Table of Contents
Java Packages
Packages in Java groups multiple classes, interfaces, or packages, etc together in a single place. We can consider a package similar to a folder. A folder can contain multiple files. Similarly, in Java, a package contains a group of classes. In this tutorial, we will learn in detail about different types of packages and how to create and use them in Java.
Advantages of Packages in Java
- Avoids naming conflicts of classes. This means we can use the same class names in 2 different packages.
- Provides reusability by accessing a class from 1 package in another.
- Easy maintenance since the classes will be organized
- Provides access protection for protected and default classes. Please refer to access modifiers for more details.
- It helps in encapsulation or data hiding.
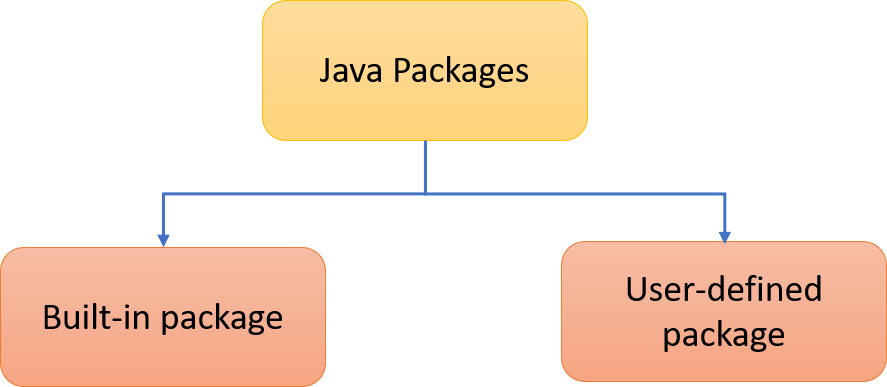
Types of Java Packages

Let’s discuss in detail about these different java packages.
Built-in Package
Java contains several built-in packages. In our previous tutorials, we have used several of them, for example, to use ArrayList, Scanner, etc. These packages come along with JDK (Java Development Kit). It contains a large number of built-in classes, which we can use directly by importing these packages.
Below are the commonly used built-in java packages:
- java.lang – language support
- java.io – input/output operations
- java.util – utility classes to implement data structures
- java.net – networking operations
- java.awt – implementing graphical user interface
- java.applet – creating Applets
Import built-in package
To use the built-in java packages and its classes, we must import the package using the import keyword. We can import either a specific class in a package or import all the classes that belong to the package.
//Imports the entire package
import packagename.*;

//Import specific class in package
import packagename.classname;
Example of importing a built-in package
If we want to import all classes of the package, we just specify the package name in the import statement. In the below example, we import all the classes of the util package. We generally import the entire package when we want to use its multiple classes in the same program. Here both the HashSet data structure and the Date method belong to the util package. Hence instead of importing both classes separately, we can import the entire package.
import java.util.*;

public class SetArray {

  public static void main(String[] args) {
    Set<String> names = new HashSet<String>();
    names.add("Roshan");
    names.add("Kiran");
    names.add("Tejas");
    names.add("Karthik");

    String[] strnames = names.toArray(new String[names.size()]);
    for(String strvalues: strnames) {
      System.out.println(strvalues);
    }
    for(String strvalue:names) {
      System.out.println(strvalue);
    }

    System.out.println(new Date());

  }

}
Roshan
Kiran
Tejas
Karthik
Roshan
Kiran
Tejas
Karthik
Fri Sep 04 15:39:42 IST 2020
Example of importing a specific class of a built-in package
In the below example, we import a specific class ArrayList that belongs to the util package. In order to use the ArrayList data structure, we can import the specific class which enables us to easily use this feature.
//Import arraylist class of util package
import java.util.ArrayList;

public class ArrayListDemo2 {

  public static void main(String[] args) {
    //Create an Integer ArrayList
    ArrayList<Integer> numbers = new ArrayList<Integer>();
    numbers.add(4);
    numbers.add(8);
    numbers.add(2);

    System.out.println("List elements: ");
    System.out.println(numbers);

    //Modify element
    numbers.set(1, 6);

    System.out.println("After modifying element at index 1:");
    System.out.println(numbers);

    //Remove an element
    numbers.remove(2);

    System.out.println("After removing element at index 2:");
    System.out.println(numbers);
  }

}
List elements:
[4, 8, 2]
After modifying element at index 1:
[4, 6, 2]
After removing element at index 2:
[4, 6]
User-defined package
Similar to java built-in package, we can also create a user-defined package to organize the classes, interfaces, etc that we create to develop software. In this tutorial, we will learn about creating a user-defined package using Eclipse IDE.
Create a package
- Create a new Java project – I have named the project “PackageDemo”.
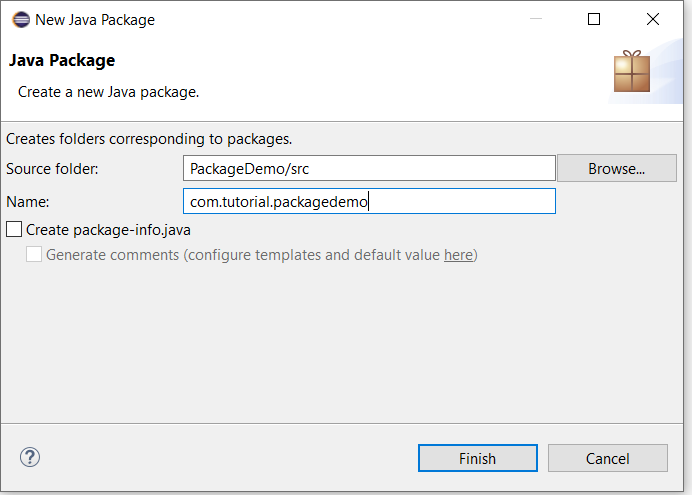
- Right click on the project -> New -> Package

3. Enter the package name. Eg: com.tutorial.packagedemo

4. Click on Finish.
Now, if you see the project folder structure, you can see the package created.

Under this package, we can create any number of classes we want. You can also check in the eclipse workspace project folder, where you can find 3 folders: com, tutorial, packagedemo.
Create a class inside the package
If we want to create a class inside a package, right-click on the package and then create a new Java class. In this way, it automatically prints you the first line: package packagename as you can see in the below example.
package com.tutorial.packagedemo;

public class Example1 {

  public static void main(String[] args) {
    System.out.println("Create new package");

  }

}
Import a package
In order to use the package in other classes, we need to import the package using the import keyword.
In the below example, first, we create a package Package1 and then create a class Student within it. Next, we create a second package, Package2, and then create a new class Teacher.
Inside packag2, we import the first package which is package1, so that we can use the class methods and variables in this class. While importing, we can either import a specific class of the package or the entire package. here we import the entire package. Hence its sufficient if we create an object for the Student class and use this instance to access the variable studentname and the method getName inside the teacher class.
//Package1
package package1;

public class Student {

  public String studentname;

  public String getName() {
    return studentname;
  }

  public static void main(String[] args) {
    Student s = new Student();
    System.out.println(s.getName());

  }

}
//Package2
package package2;
import package1.*;

public class Teacher {
  String teachername;

  Teacher(String name) {
    this.teachername = name;
  }

  public static void main(String[] args) {
    Teacher t = new Teacher("Usha");
    Student s = new Student();
    s.studentname = "Ramesh";
    System.out.println("Student Name: " + s.getName());
    System.out.println("Teacher Nmame: " + t.teachername);


  }

}
Student Name: Ramesh
Teacher Nmame: Usha
Import a specific class in a package
Let’s consider the same example as above and see how to import a specific class in a package. Here you can see that we import the Student class of the package package1. Instead of packagename.*, we use packagename.classname in the import statement.
package package2;
import package1.Student;

public class Teacher {
  String teachername;

  Teacher(String name) {
    this.teachername = name;
  }

  public static void main(String[] args) {
    Teacher t = new Teacher("Usha");
    Student s = new Student();
    s.studentname = "Ramesh";
    System.out.println("Student Name: " + s.getName());
    System.out.println("Teacher Nmame: " + t.teachername);


  }

}
Import package using a fully qualified name
We can also import a package class without using the import statement. But instead, we must use packagename.classname while creating the object instead of class name alone. In this case, we can use only a specific class’s features.
Below is an example of importing a package class using a fully qualified name that is package1.Student. We will use the above example itself so that it will help you to clearly differentiate the different ways of importing a package from another package.
package package2;

public class Teacher {
  String teachername;

  Teacher(String name) {
    this.teachername = name;
  }

  public static void main(String[] args) {
    Teacher t = new Teacher("Usha");
    package1.Student s = new package1.Student();
    s.studentname = "Ramesh";
    System.out.println("Student Name: " + s.getName());
    System.out.println("Teacher Nmame: " + t.teachername);


  }

}
Student Name: Ramesh
Teacher Nmame: Usha
Static Import of Java package
Java 5 and above supports static import. This means when use the static import, we dont need to specify the class name while accessing its fields or methods.
import static java.lang.System.*;

public class StaticImportDemo {

  public static void main(String[] args) {
    out.println("Exmaple of static import");

  }

}
Exmaple of static import
Sub-packages in Java
When we create a package within a package, we name it as a subpackage. We saw in the above example while creating a new package with name as “com.tutorial.packagedemo”, which is an example of subpackage.
We must always follow the naming convention as domain.company.packagename while creating sub-packages in real world.
Package naming convention
When we create user-defined packages, it is always best practice to follow the suitable naming conventions as below:
- We should have at least 3 directories while creating sub-packages. Eg: com.tutorial.packagedemo. This has 3 directories or folders.
- The package name will be the last folder or directory name while creating subpackages
- Always provide a suitable package name that reflects the classes in that package.
package com.tutorial.packagedemo;
public class Example1 {

  public static void main(String[] args) {
    System.out.println("Create a new package");

  }

}
Multiple classes in a package
We can create multiple public classes in the same package. We must always ensure that the package declaration should be the same in all classes.
package com.tutorial.packagedemo;
public class Example1 {

  public static void main(String[] args) {
    System.out.println("Create a new package");

  }

}
package com.tutorial.packagedemo;

public class Example2 {

  public static void main(String[] args) {
    System.out.println("Multiple classes in a package");

  }

}
Compile and run Java package without IDE
If we are not using IDE to write java program, then we compile the java program with the package name as below:
- Save the file as Person.java
- Compile the code using the command javac Person.java
- Now compile the package using the command javac -d . Person.java. In this case, it forces the compiler to create the package and save it in the destination specified after -d. If we use “.”, it takes the current directory.
- We can then execute the java code using the command java package1.Person
package package1;

public class Person{

  public String name;

  public String getPersonName() {
    return name;
  }

  public static void main(String[] args) {
    Person p = new Person();
    System.out.println(p.getPersonName());

  }

}