Databases form an integral part of any application. It is used for reading and persisting data.
[vc_row][vc_column width=”2/3″][td_block_text_with_title custom_title=”What is an embedded DB?”][/td_block_text_with_title][/vc_column][/vc_row]
- Typical databases require a lot of set-up. For example, in order to use Oracle or MYSQL in an application, you would need to do the following steps:
- Install DB.
- Setup schema and tables
- Populate the Data
- Using Datasource to connect with DB and a lot of custom code
- Let us consider a situation where we want to do a quick POC during development. Using traditional DB in such scenarios involves a lot of overhead and is usually not recommended. This is where the embedded(in-memory) Database concept comes into picture.
- The embedded database concept is very helpful during the development phase, because they are lightweight, fast, quick start time, improve testability, ease of configuration. It lets the developer focus more on the development instead of focusing on details like how to configure a data source to the database, or waste time to start a heavyweight database to just test a few lines of code.
- Some examples of an embedded (or) In-Memory Databases are:
- HSQLDB
- H2
- Derby
Note that :
- An in-memory database is created when an application starts up and destroyed when the application is stopped. Hence, the data is lost if the server is restarted. Hence, this is not an ideal option for Production environments.
- Embedded DB option is available since Spring 3.0
- Changing Spring Boot from Embedded DB(like H2/HSQL) to Traditional DB(Oracle, MySQL) is easy to do without much configurations.
In this tutorial, we are going to see how we can integrate Spring Boot with an embedded database like HSQLDB.
Spring provides a nice abstraction on top of JDBC API using JdbcTemplate and also provides great transaction management capabilities using annotation based approach.
Table of Contents
Using HSQLDB with JDBCTemplate
In this example, we are creating a simple program that saves the customer details ( First Name, Last Name, Age and Place) in an embedded HSQLDB and prints the same in the console.
Adding the maven dependencies
- Create a sample Spring Boot project as mentioned in the tutorial: https://tutorialcup.com/spring-boot/run-spring-boot-spplication.htm
- Add the following maven dependencies:
<dependency>
  <groupId>org.springframework.boot</groupId>
  <artifactId>spring-boot-starter-jdbc</artifactId>
</dependency>
<dependency>
  <groupId>org.hsqldb</groupId>
  <artifactId>hsqldb</artifactId>
  <scope>runtime</scope>
</dependency>
- Note that in the above dependencies:
- spring-boot-starter-jdbc : Adds the necessary JdbcTemplate and other JDBC libraries.
- hsqldb : Adds the HSQLDB libraries.
Creating Schema/Populating Data
As we already know by now that, the tables/schema present in an embedded DB are lost/erased once the application is re-started. One way to initialize the schema/data is by using the SQL files in the classpath during application start-up.
We can create multiple schema/data SQL files one for each for the Database framework and place it in the application classpath.
For example:
- For HSQLDB, the file-names will be in this format:
- schema-hsqldb.sql
- data-hsqldb.sql
- For MYSQL, the file-names will be in this format:
- schema-mysql.sql
- data-mysql.sql
The file to be picked is decided by the value assigned to the property spring.datasource.platform. In this post, we are going to create a schema-hsqldb.sql file with the following contents and place it under src/main/resources folder.
CREATE TABLE person(
  first_name  VARCHAR(150),
  last_name   VARCHAR(150),
  age         INTEGER,
  place       VARCHAR(100)
);
Next step, is to add the property spring.datasource.platform in application.properties.
spring.datasource.platform=hsqldb
Creating a Model class
- Create a Customer model class as shown below:
package com.example.demo.model;
public class Customer {
    private String firstName;
    private String lastName;
    private int age;
    private String place;
    public String getFirstName() {
      return firstName;
    }
    public void setFirstName(String firstName) {
      this.firstName = firstName;
    }
    public String getLastName() {
      return lastName;
    }
    public void setLastName(String lastName) {
      this.lastName = lastName;
    }
    public int getAge() {
      return age;
    }
    public void setAge(int age) {
      this.age = age;
    }
    public String getPlace() {
      return place;
    }
    public void setPlace(String place) {
      this.place = place;
    }
    public String toString(){
      StringBuilder builder = new StringBuilder();
      builder.append(this.getFirstName())
        .append(", ")
        .append(this.getLastName())
        .append(", ")
        .append(this.getPlace())
        .append(", ")
        .append(this.getAge());
      return builder.toString();
    }
  }
Creating a Service Class
Next step, is the creation of a Customer service Class that makes use of JdbcTemplate for saving or retrieving the Customer details. It has two methods as shown below: addCustomer() and getAllCustomers().
package com.example.demo.service;
import java.sql.ResultSet;
import java.sql.SQLException;
import java.util.List;
import org.springframework.beans.factory.annotation.Autowired;
import org.springframework.jdbc.core.JdbcTemplate;
import org.springframework.jdbc.core.RowMapper;
import org.springframework.stereotype.Service;
import com.example.demo.model.Customer;
@Service
public class CustomerService {
  @Autowired
  private JdbcTemplate jdbcTemplate;
  public int addCustomer(Customer customer) {
    String sql = "INSERT INTO customer(first_name, last_name, age, place) VALUES(?,?,?,?)";
    return jdbcTemplate.update(sql, customer.getFirstName(), customer.getLastName(), customer.getAge(),
        customer.getPlace());
  }
  public List<Customer> getAllCustomers() {
    return jdbcTemplate.query("SELECT * FROM customer", new RowMapper<Customer>() {
      public Customer mapRow(ResultSet rs, int arg1) throws SQLException {
        Customer c = new Customer();
        c.setAge(rs.getInt("age"));
        c.setFirstName(rs.getString("first_name"));
        c.setLastName(rs.getString("last_name"));
        c.setPlace(rs.getString("place"));
        return c;
      }
    });
  }
}
Creating Main Class
Next step is the creation of the Main class that launches the SpringBootApplication. Below is the definition of SpringbootSqlDemo class:
package com.example.demo;
import org.slf4j.Logger;
import org.slf4j.LoggerFactory;
import org.springframework.beans.factory.annotation.Autowired;
import org.springframework.boot.CommandLineRunner;
import org.springframework.boot.SpringApplication;
import org.springframework.boot.autoconfigure.SpringBootApplication;
import com.example.demo.model.Customer;
import com.example.demo.service.CustomerService;
@SpringBootApplication
public class SpringbootSqlDemo implements CommandLineRunner{
  Logger logger = LoggerFactory.getLogger(SpringbootSqlDemo.class);
  @Autowired
  CustomerService customerService;
  public void run(String... args) {
    Customer customer = new Customer();
    customer.setFirstName("Rahul");
    customer.setLastName("Gupta");
    customer.setAge(20);
    customer.setPlace("Bengaluru");
    if (customerService.addCustomer(customer) > 0){
      logger.info("****Customer added successfully****");
    }
    for(Customer p : customerService.getAllCustomers()){
      logger.info(p.toString());
    }
  }
  public static void main(String[] args) {
    SpringApplication.run(SpringbootSqlDemo.class, args);
  }
}
In the above class, when the application gets started up and the run() method is called, it inserts one customer entry and then prints all the entries in the “customer” table.
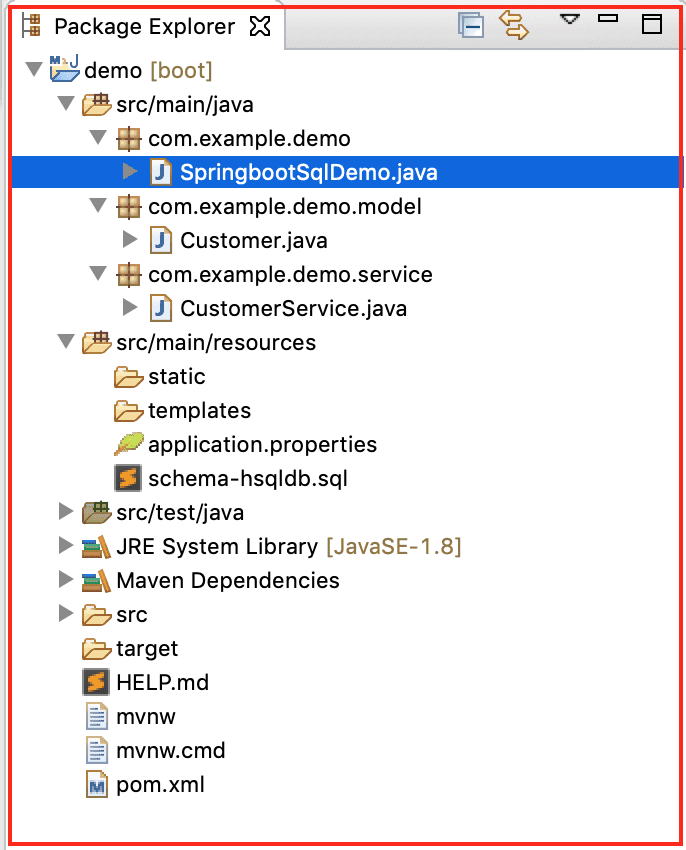
The final application structure looks as below:
Now, lets run the application and observe the console output:

You can notice that a new row has been added to customer table and also all the rows available in the table have been printed.
You can download the source code from the below link:
Conclusion
In this tutorial, we have learnt how to integrate a spring boot application with an embedded Database HSQLDB. In the next tutorial, we are going to see how to work with Traditional DB like Oracle, MySQL etc….
References
You can refer to the following links from spring boot documentation: