Table of Contents
Introduction
We test and review the software products to improve their quality by identifying the potential bugs and problems. These bugs when appearing on the customer’s environment reflect the poor quality product. But only doing the testing and locating the bug is not sufficient. It is important to register the defects and fix them so that the system becomes free from that problem. This process of tracking the bug from its birth until its end is called bug lifecycle.
What is a bug
Bug or defect is the deviation of the system from its correct or expected behavior. Any error or fault in the code or in the system can cause it to produce unexpected output. Bugs can be found during any lifecycle phase of the product like testing or review or also while the product is in business use as well. Once a defect is identified the primary objective is to verify and fix it.
What is Bug lifecycle
The bug lifecycle is the sequence of phases which bug goes through from its identification to the closure. This lifecycle ensures that the fix resolves the bug and also tracks it to the closure. It ascertains that the product becomes free of the identified defect.
Mostly, this process of bug’s journey from its start till the end depends on the project. But this article gives a generic view of a typical bug lifecycle.
The life cycle of a bug
A defect traverses from one state to another in its lifetime as per its status. The different stages of a typical lifecycle of the bug are:
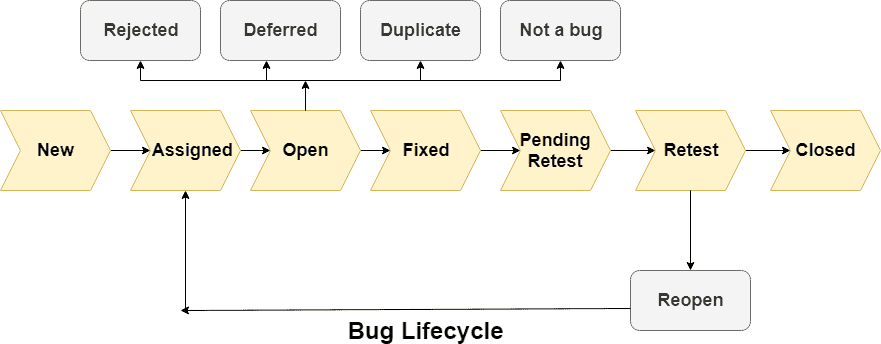
- New: The first state of defect is New when it is registered. The bug in the new state shows that there is a deviation from the correct behavior of the product. Hence, the tester has created a New defect in the bug tracking tool. The details of the defect have id, priority, severity, affected areas, and recreation steps.
- Assigned: After a bug creation in the bug tracking tool, QA lead or manager allocates it to the development team or to an individual developer for further analysis. At this stage, the bug moves to Assigned status.
- Open: Now the developer who is assigned with the bug needs to start working on it. Hence, he moves it to Open state which implies that the defect is in work in progress now. The developer recreates the defect and does its analysis. With this analysis, he can decide to go ahead with fixing it. Otherwise, he depending on various factors like the priority of bug, release timeline and scope, he can move it to different states which are discussed next.
- Deferred: A bug moves to Deferred state when it is to be fixed later. This state shows that the bug will be worked upon in next or upcoming cycles. The reason for deferring the defect can be that bug may be of low priority or it may be of a low-risk area or there can be a release coming up so this defect will go as part of next release.
- Duplicate: A bug goes to Duplicate status when there is already a bug in the system for the same problem. So this bug is just a duplicate of some other bug.
- Rejected: The bug gets Rejected when the developer feels it is an incorrect observation. There can be some configuration issue or misunderstanding of the requirement or incorrect input by the tester. The developer will provide his comments to clarify the same and moves the bug to the rejected state.
- Not a bug: At times the bug is more of a change request or an enhancement or new feature addition to the product instead of being incorrect behavior. While working users may come up with some changes which they feel should become part of the product. In this case, the bug moves to “Not a bug” state and it is kept for further research for enhancements.
- Fixed: After analysis and recreation, the developer fixes the defect and check-ins the fixed code into the code management system. Then, he moves the defect to a Fixed state.
- Pending Retest: This is the state when the fix of the defect is awaiting the retesting by the tester.
- Retest: After the developer provides the fix for the defect, tester retests it. The retesting verifies if the fix resolves the defect. In this stage, the defect is in Retest state.
- Reopen: If the tester still faces the defect even after deploying the developer’s fix then the fix from the developer does not resolve the defect. Hence, the tester moves the defect to the Reopen state.
- Closed: Once tester verifies the fix and confirms that the fix from developer resolves the bug, he moves the defect to the Closed status. This marks the closure of the defect lifecycle.
Elements of the bug report
The good bug report is crucial in order to convey the right details to the working team members. Some of the important fields of the bug report are:
ID: It is the unique identification number of the bug throughout its lifecycle in the tracking tool.
Bug Title: It gives the appropriate introduction to the bug giving a high-level idea about it.
Bug Status: It describes the current status of the bug. While opening, bug remains in New status.
Severity: Severity implies the impact the defect can cause to the system’s operation. Check-out link of e-commerce website crashing is a more severe issue than invisible twitter feeds issue. Hence, severity shows the impact of the bug on the normal operation of the system.
Priority: Priority is the urgency or the order with which defect should be fixed. High priority issues require immediate fixing or work around. For instance, if the website server is down, it is a high priority issue. Hence, it requires immediate attention and resolution.
Project details: This field describes the details like name, description, phase, etc about the project. It helps to identify the project which owns the bug.
Environment details: It provides a description of the environment where the bug occurred. It helps with the recreation of the bug.
Expected Output: This field describes what is the correct or expected behavior from the product. It is the expected result.
Assigned to: It provides the name of the developer who will be workings on the fix of the bug.
Recreation Steps: This is a very important field which describes how to reproduce the issue. It should be very clear and written in a simple language. Moreover, it should be stepwise from the starting to the end giving the explicit instructions on issue recreation.
Bug Description: It provides all the details about the bug. It can be lengthy and can provide all the details about the bug, its recreation, input data, and any other details. It can have many screenshots as well to describe how and when the bug happened.
Conclusion
To conclude, bug lifecycle is the process of tracking the bug and its management. The lifespan of bug starts when there is a deviation from the expected behavior of the product. And it continues until the fixing and the retesting of the bug. This entire process ensures that effective tracking and management of the bugs. It also eradicates effort for duplicate bugs and paves a way for further enhancements and features also by registering the observations.