Table of Contents
Introduction
For web automation using Selenium, the start step is to locate web elements on the webpage. Web element is any component or unit on the webpage like text box, checkbox, dropdown, button or any image. During manual testing, the tester interacts with these web components like enters text in text boxes, clicks on buttons, select the checkbox, etc to execute the test scenarios. Thus, in automation testing, we need to write code to mimic the same manual actions to automate the manual step.
Therefore, for automation, the first step is to locate the web elements on the webpage. To help with development and automation needs of finding the web elements, browsers provide the in-built inspector tool. In this article, we will learn how to use the browser inspector tool for approaching web elements.
Inspection in Firefox browser
Now Let us look at how we can invoke the browser inspector tool in the Firefox browser.
- Access any web application for testing by giving its URL in the browser. I am using “https://mail.rediff.com/cgi-bin/login.cgi” URL as an example.

2. After opening the test application, press function key F12 or CTRL + Shift + I. It will open another section in the webpage with all the HTML details about the webpage. By default, it will be in the inspector tab of the section. This is the development HTML code of the webpage written by the developer. For automation, these HTML tags help with writing the locators. Now click on the top left icon as shown in the screenshot below. This is the sn utility which helps select the web elements from the webpage.

3. After clicking on the inspection icon, move the mouse to the username field and click. Next, observe that the HTML tag related to username textbox gets highlighted. This is the tag we need for writing our locators. Hence, the inspector helped us to find this tag from the HTML code of the webpage.
<input type=”text” name=”login” value=”” size=”26″>
So the attributes of username filed are it is of type text, its name is login and size is 26. These attributes help us form the locators to help Selenium find the web elements.

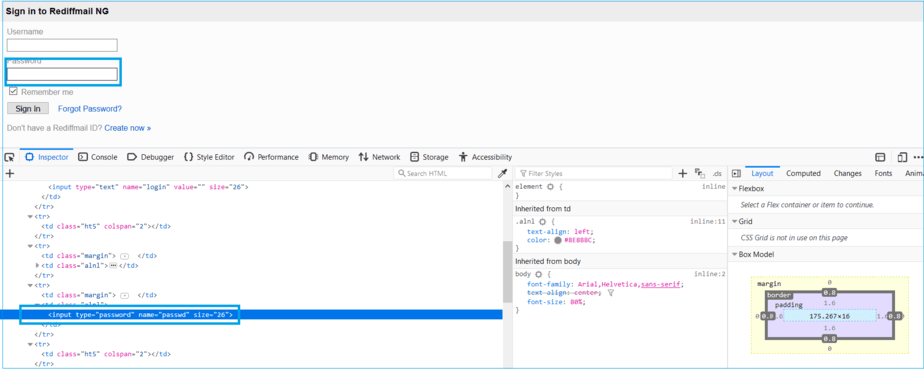
4. For further practice, let us inspect the password field. Click on the inspector icon at the top left side of the browser inspector window and next click on the password field. Now it will highlight the HTML tags corresponding to the password textbox.
<input type=”password” name=”passwd” size=”26″>
5. Similarly, try out inspecting the Sign in button. It will highlight the HTML tag corresponding to the sign in button.
<input type=”submit” value=” Sign in “>

Inspection in the Chrome browser
Let us now use the inspector tool of Chrome browser.
- To start with, first access the test URL. I am using “https://mail.rediff.com/cgi-bin/login.cgi”. Next press F12 or CTRL+Shift+I to open the browser inspector section for the page.

2. Click on the inspector icon on the top left and next click on the username field to inspect it. The corresponding HTML tag will get highlighted.

Like this, you can inspect web elements in the Chrome browser.
Inspection in IE browser
- Load the test application by using the URL in IE browser. I am using “https://mail.rediff.com/cgi-bin/login.cgi”. Press F12 or CTRL+Shift+I to open the inspection section.

2. Click on the inspection icon below Elements as highlighted in the screen shot below. Next, click on the username field to highlight the corresponding HTML code in IE browser.

So this is how we can inspect the web elements in the IE browser.
Conclusion
This article talks about the browser inspector tool which we can invoke to access the web elements. Approaching the web elements is the first step in the automation process as it needs to perform operations on them. Apart from tools from the browser, there are some advance plugins available which help to form locators for web elements.