In
This tutorial explains how to Create your first Spring Boot Web Application using STS (Spring Tool Suite).
STS is an Eclipse-based development environment that is wonderfully customized for developing Spring based applications.
Lets learn how to create spring boot application.
Table of Contents
Creating Application using STS
Following are the steps to Create your first Spring Boot Web Application
- If you don’t have STS already installed, download and install the latest version of STS from the following link for your respective Operating System:https://spring.io/tools
- You should see the following screen upon opening STS for the first time.
- Select the workspace directory path to store your project code as below or keep the default path suggested by STS:

- Click on the Launch button after selecting the workspace directory.
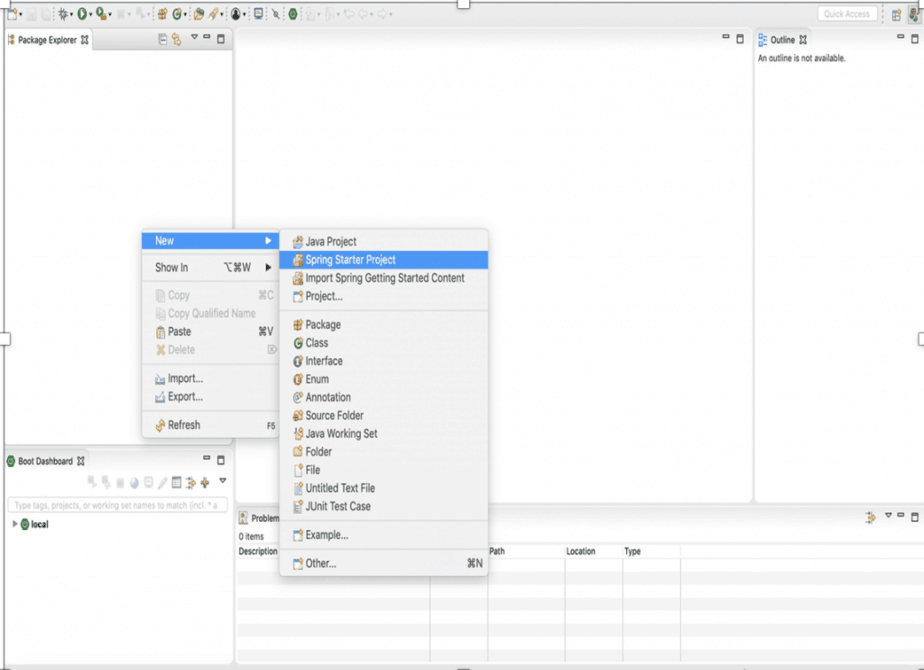
- Right click on the Package Explorer.Select New -> Spring Starter Project to create a spring boot project in the following screen:
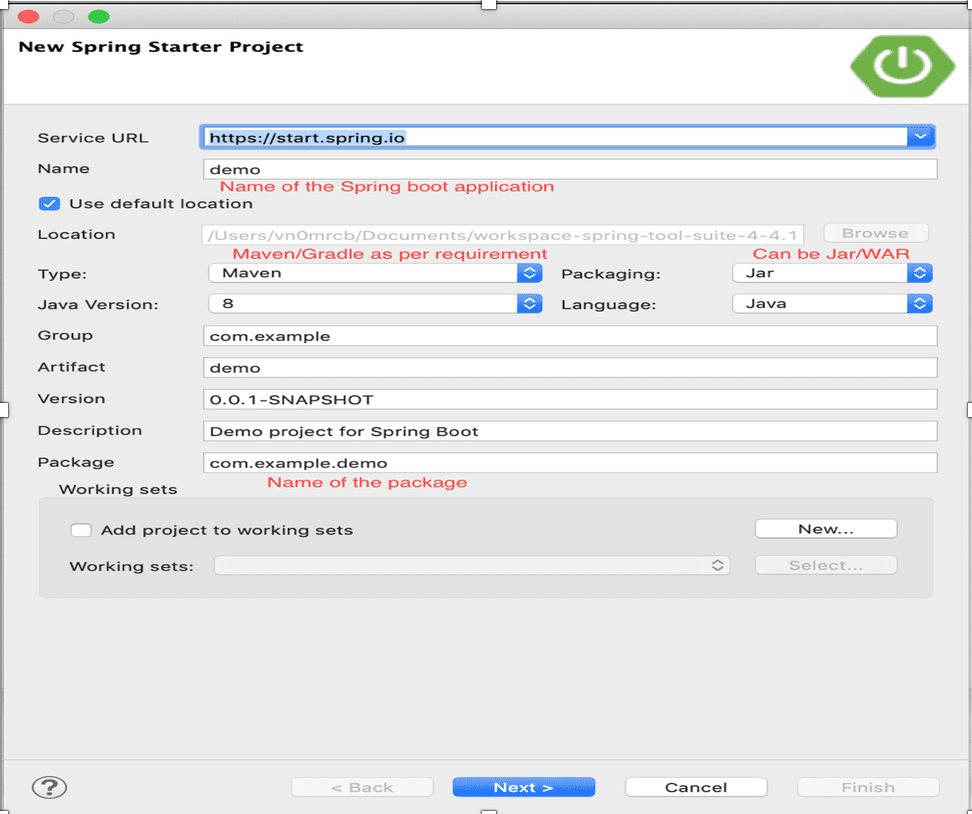
- After selecting the Spring Starter Project, as shown above, you can choose the options (like Packaging Type, Java Version, package name, build tool, Name of the application, etc) for configuring the Spring boot application using the following screen and click on Next.
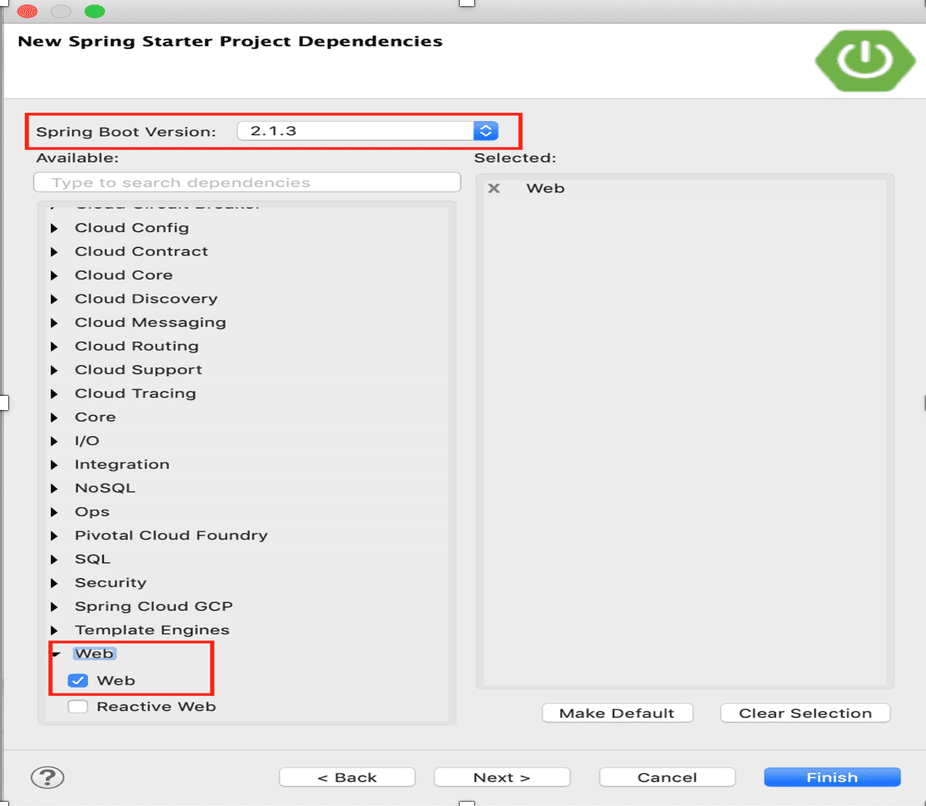
- On clicking Next as shown above, you can select the Spring Starter Project dependencies.
- First, Select the Spring boot version. In this case, it is 2.1.3.
- Since we are trying to create a web application, we need to select the ‘Web’ dependency from the List as shown below and Click on Finish:
- Once done, examine the project hierarchy and notice that all the dependent Maven dependencies automatically to the classpath and this is the main power of Spring boot.
Note: In the below screen, all the Maven dependencies gets downloaded automatically.

It was the responsibility of the developer to carefully select the compatible versions of the dependent libraries to make the application up and running before the introduction of Spring Boot.
However, with the introduction of Spring boot, it downloads all the required libraries automatically, just by mentioning the Spring boot version and Web dependency as shown in above “Project dependencies screen”.
Project POM.xml
- Examine the auto-created project’s pom.xml and notice the following main tags:

- spring-boot-starter-parent: This parent declaration downloads all the Basic Spring libraries into the CLASSPATH.
- spring-boot-starter-web: This dependency downloads all the web application libraries required. Also, it provides the following advantages:
- For instance, note that tomcat embedded server dependencies get downloaded as well.
- Thus, we do not need to install and configure Tomcat separately for deploying Spring boot application.
- spring-boot-starter-test: This dependency imports both Spring Boot test modules as well as:
- JUnit
Main Class
- Examine the following source code in DemoApplication.java under src/main/java package which is the starting point for the Spring boot application.
- For instance, in the following code, the main() method uses SpringApplication.run() method to launch the application.
package com.example.demo;

import org.springframework.boot.SpringApplication;
import org.springframework.boot.autoconfigure.SpringBootApplication;

@SpringBootApplication
public class DemoApplication {

  public static void main(String[] args) {
    SpringApplication.run(DemoApplication.class, args);
  }

}
Please note in the above code, @SpringBootApplication annotation is present.
@SpringBootApplication single annotation is equivalent to including the following 3 annotations:
- @Configuration: Indicates that the class is a source for bean definitions.
- @EnableAutoConfiguration: It sets and configures beans based on the CLASSPATH entries. Auto-configuration classes get applied based on the CLASSPATH and the beans which are defined.
- @ComponentScan: Spring can auto-scan all the classes with this annotation and registers it with the Application context when the Spring application starts.
Web Application Controller Class
- Now that we have a main class, let’s now create a web application controller that handles incoming web requests.
- For example, refer HelloWebController.java present under
same package like in below example DemoApplication.java :
package com.example.demo;

import org.springframework.web.bind.annotation.RestController;
import org.springframework.web.bind.annotation.RequestMapping;

@RestController
public class HelloWebController {

@RequestMapping("/")
public String index() {
return "Hello World!!";
}
}
Above annotations @RestController and @RequestMapping are described below.
- @RestController – This annotation indicates that this class handles Web MVC requests.
- @RequestMapping – This annotation is defined on the method to invoke based on the incoming request path.
In the above example, all requests coming with ‘/’ are mapped to index() method and returns a plain text message: “Hello World!!
Running the Application
- Till now we have
learnt how to create your first Spring Boot Web Application. Now its time to execute it. - You can run the application created just like a java application
by :

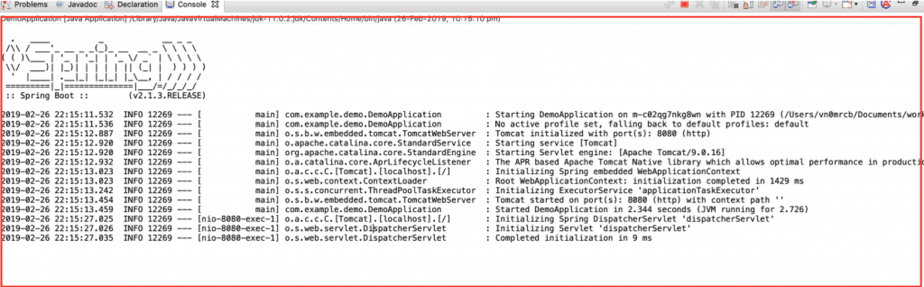
Console Output
- Open the Console window to see the following output:
Testing the Application
- Open the browser and hit the following URL: https://localhost:8080/
- You should see the following output rendered by the browser:

[vc_row][vc_column width=”2/3″][td_block_text_with_title custom_title=”Conclusion”][/td_block_text_with_title][/vc_column][/vc_row]
In this tutorial, you have learned about how to create your first Spring Boot Web Application and how to run your first Hello World spring boot web application. Next tutorial will explain about the Spring boot Build Systems and Starter module.
[vc_row][vc_column width=”2/3″][td_block_text_with_title custom_title=”References”][/td_block_text_with_title][/vc_column][/vc_row]