- We already know that, Spring Boot enables to make development faster by quickly setting up and running Applications.
- It provides an additional module named “spring-boot-devtools” in order to provide some additional development time advantages.
- This tutorial focuses on the additional features provided by Spring boot Developer tools and how it makes the development experience pleasant.
Table of Contents
Developer Tools
- In order to add Developer Tools Support into your application, simply add the following dependency in your project:
<dependency>
  <groupId>org.springframework.boot</groupId>
  <artifactId>spring-boot-devtools</artifactId>
  <optional>true</optional>
</dependency>
- The equivalent gradle configuration is as follows:
configurations {
  developmentOnly
  runtimeClasspath {
    extendsFrom developmentOnly
  }
}
dependencies {
  developmentOnly("org.springframework.boot:spring-boot-devtools")
}Note: If you run your application using “java -jar <<fileName.jar>>””, then it is considered as a production application, and Dev tools are disabled automatically by default.
Property Defaults
- By default, Spring Boot provides caching support for many of its libraries. Even though this is quite a beneficial and essential feature in a production environment, it might prove to be counter-productive for a developer to see his changes immediately during development.
- In such cases, Developer Tools comes to the rescue. It automatically disables the caches during development time by means of properties present in application.properties.
- In other words, Developer tools module provides sensible development time defaults through this properties file. Thus, it helps to reduce the manual work and complexity on the part of developer to set these properties manually.
Note: If you don’t want property defaults to be applied, set: spring.devtools.add-properties to false in application.properties.
Auto Restart
- Applications using “spring-boot-dev-tools” module automatically restarts when it detects changes in the files present in the CLASSPATH. This helps to quickly view the changes made by the developer.
- Changes to certain resources do not necessarily need to trigger a restart. For instance, changing resources in /META-INF/maven, /META-INF/resources, /resources, /static, /public, or /templates does not need to trigger a restart but instead trigger a Live Reload.
What is Live Reload?
Spring Boot dev tools include support for Live Reload capability that refreshes the browser whenever resources change.
[vc_row][vc_column width=”2/3″][td_block_text_with_title custom_title=”Using Trigger File”][/td_block_text_with_title][/vc_column][/vc_row]
- If you do not wish to change files every-time you change the source files, you can instead use a global trigger file. Dev Tools monitors changes to this trigger file and restarts the application if any changes are detected.
To use a trigger file, set the following property: “spring.devtools.restart.trigger-file” to the path of your trigger file.
Running Remote Applications
Developer Tools contains several features when running applications remotely. The following section will give an overview on how to run the remote applications and push remote updates.
Running a Remote Client Application
We can run remote client applications from within our IDE.
- For example, if we are using STS and have an application named “demo” that is deployed to Cloud (For example, Heroku), you can follow the below steps to run a remote client application.
- Go to Run As->Run Configurations as shown in the following screen:

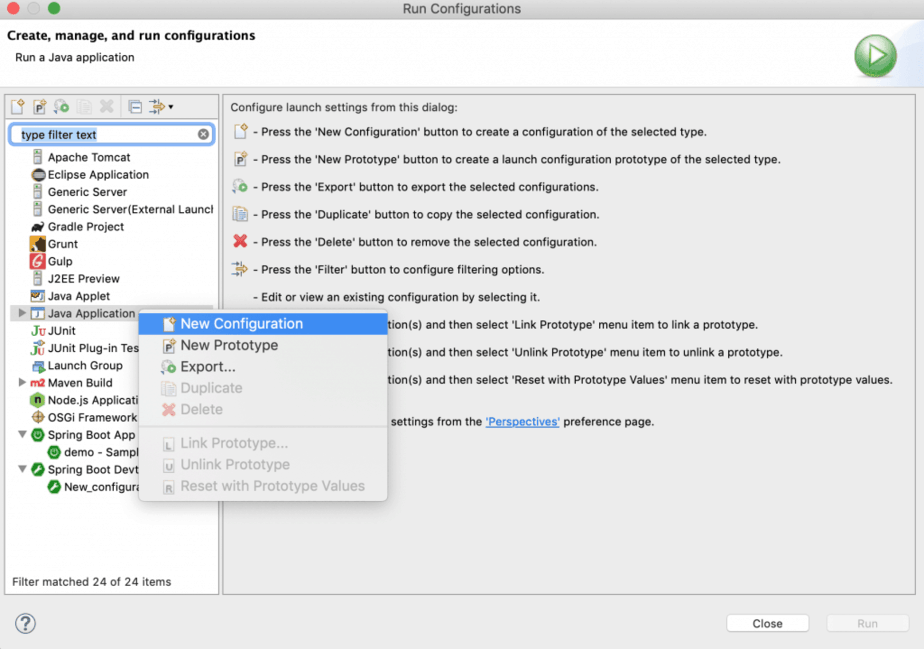
2. Next, Right Click on Java Application and select “New Configuration” as shown in the following screenshot:

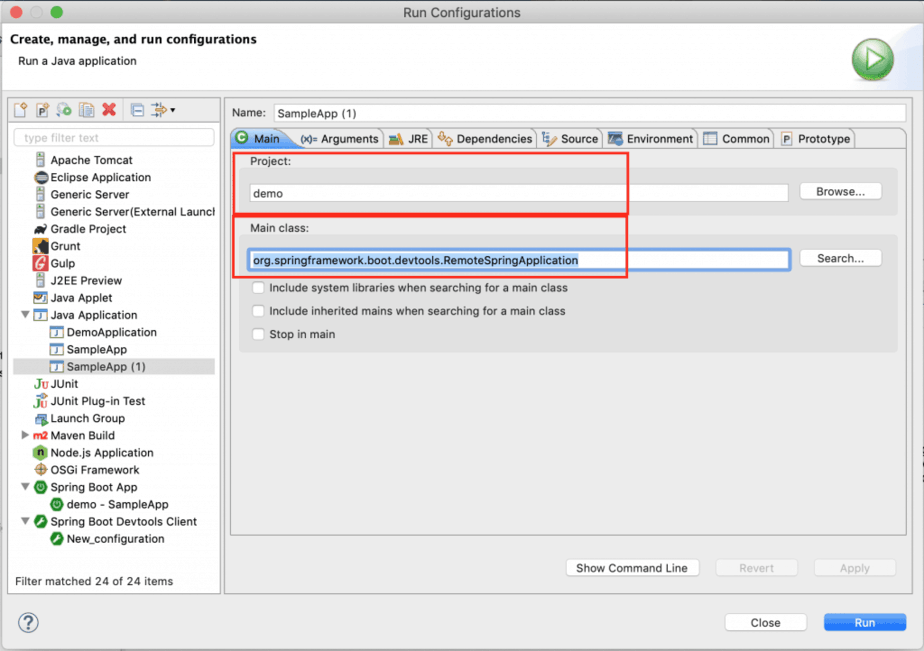
3. Next, Select the Project Name (for example, ‘demo’) and select the Main class as “org.springframework.boot.devtools.RemoteSpringApplication“.
Refer the following screenshot:

4. Next, Click on the “Arguments” tab and provide the Remote URL where your application is deployed as shown in the following screen:

Deployment to cloud platforms like Heroku, for example, will be covered in later tutorials. You need not worry about it for now.
Caution: Never enable spring-boot-devtools support on a production remote application. It is a serious security risk.
Note: Remember to add following property in application.properties: spring.devtools.remote.secret=mysecret
This is passed to the remote server for authentication.
Remote Updates
The Remote client monitors for changes to the files in the CLASSPATH and pushes the changes to the remote server.
Conclusion
To conclude, in this tutorial, we have learnt about the Developer friendly tools provided by Spring Boot for a pleasant development experience. Also, we have learnt about how to debug and run a remote client application.
In the next tutorial, we will focus on the production ready features provided by Spring Boot.
References
Refer the following links as next steps:
https://docs.spring.io/spring-boot/docs/current/reference/htmlsingle/#using-boot-devtools